Sunday, April 4, 2021

What is Headlight Restoration

Having Headlights Restored

Headlight restoration, when done right, can mark the difference between a functional and dysfunctional headlight.

Did you know that faded headlights are in fact, illegal and unsafe?

In fact, vehicles with faded headlights won’t pass a roadworthy certificate.

This will deem the vehicle illegal for road use.

Opaque headlights will reduce your visibility at night up to a massive 75%.

Replacing headlights is expensive and in most cases not necessary.

Yes, you can fix them yourself, it’s also recommended that you find a professional car detailer to help you fix the problem.

But what does headlight restoration really mean?

headlight restoration done

WHY HEADLIGHTS DISCOLOUR

As vehicles age, the plastic headlight lenses deteriorate due to abrasion and permanent Headlight Restoration & Repair Specialists Our Technicians UV damage.

The headlights become a dirty yellow colour with an opaque surface.

This surface damage can dramatically reduce the light output and make headlights less effective if not treated early.

In climates like Brisbane, our tropical climate damages porous surfaces like the plastic that makes headlight lenses.

A common myth is that headlight deterioration happens on the inside of the lens. This is not true, the damage is all on the outside.

There are two different types of headlight lenses – Plastic and Glass.

Glass Headlights

Glass headlight lenses do not deteriorate like plastic, but they chip and crack and need replacing.

In the ’90s glass headlights were phased out and replaced with polycarbonate so the only glass headlights are on older-style cars

Polycarbonate Headlights

Headlights on virtually all cars are now made of polycarbonate. It is an extremely tough plastic that is also porous and discolors in UV rays. The fading that we see is called Oxidation, and this also occurs on the paintwork of our cars.

To prevent oxidization to the polycarbonate, headlight manufacturers apply a protective hard coating to the outside of the lens to seal and protect the headlight and plastic from discoloring.

Over time, this factory protective clear hard coat degrades (oxidizes) and needs to be removed entirely and replaced with another quality protective clear hard coat that lasts.

Benefits Of Headlight Restoration

Modern-day headlights are made from a polycarbonate plastic material. Even though this makes them sturdy and durable, the main downside is the oxidation that happens over time from UV rays

In warmer climates, this leads to cars needing headlight restoration more often than cars in cooler climates. Below are some of the main benefits ofcleaningyour headlights once you notice they’re dimming or turning yellowish.

  • Enhance road safety:Dull and dim headlights means impaired vision while on the roads. If you do regular night driving, this is a safety concern.
  • Help to maintain your car value:When there’s a fault in your car, the value goes down. To keep your car roadworthy, you will need to keep your headlights maintained.
  • Saves you money:Restoring discolored headlights means fixing the ones that are already in place. This costs less than having to buy a new one from the stores.
  • Improves your vehicle’s aesthetics:Dull and yellowish headlights give your car a boring look. However, by restoring the headlights, you can give your car a whole fresh appearance.
  • Increase visibility:oxidized headlights dull the light that is being emitted. However, restoring the headlights will give you sharp new vision at night

headlight restoration

What To Check For When Researching Headlight Restoration

Many low-cost headlight restoration services only remove the degraded factory protective clear coat.

This is polished off and it leaves the unprotected plastic lens bare.

Within months the unprotected headlights will start to discolor and develop ‘crazing’ or tiny cracks in the lens surface.

Doing this headlight restoration method removes all the protection that stops the lens from being damaged by UV rays.

The headlights are covered with this coating to protect it for this reason.

Doing machine buffing on your headlights is a short-term fix and will cause permanent damage to the lens as it is left unprotected.

Don’t Take Short Cuts

A correct Headlight Restoration is when the car detailer completely removes the old degraded factory clear coat. The headlight is lightly polished and then the surrounded areas of the car are masked up.

The headlights are sprayed with a protective coating and this cures to create a new protective clear coat that etches into the polycarbonate.

It creates a ‘rock hard’ protective clear coating which is also chemical resistant, non-yellowing, and lasts as long as brand new replacement headlights.

How To Restore Headlights

There are two ways to restoring your headlights.

One, you can do it yourself, or two, you can hire a professional car detailer.

If you are going to do it yourself, be sure to buy a proper kit.

There are some old wives’ tales for cleaning headlights, and one of those is that toothpaste is good for cleaning headlights.

Now, this method used to work on glass headlights. Toothpaste is gentle abrasive but should not rub any abrasives on your headlights as you are wearing down the much-needed sealant that protects the lens.

When the coating is damaged it needs to be removed entirely and replaced. Don’t add further damage with a mild abrasive like toothpaste

We recommend you find a car detailing specialist to help you out rather than trying to do it yourself

But If you decide to do it yourself, here are the steps to take;

You will need to buy a headlight restoration kit before you start.

  • Wash the car.
  • Tape up the edges surrounding the headlight.
  • Use sandpaper to remove the cloudiness on the surface
  • Use the supplied polish to smooth out the lenses.
  • Apply any supplied final coatings and follow the instructions

Wrapping it up

Keep your car roadworthy and provide better night vision while you are driving by getting a specialist to check them out and advise you appropriately.

Once you notice your headlights are dim, foggy, have a dull haze, or are turning yellowish, this would be the signal to book your car in for a car detail and headlight restoration service.

When you combine the 2 services, your car will look new again with polished paintwork and bright new headlights.

We are your local headlight restoration and repair experts. Please contact us to learn more about our car detailing Brisbaneservices

The Article What Is Headlight Restoration First Appeared ON

: https://limitsofstrategy.com

Wedding Makeup Tips

Wedding Make up Tips

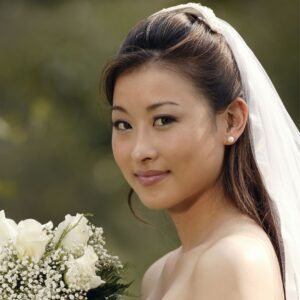
Looking for wedding makeup tips before your big day?

Then you’ve come to the right place because we’ve compiled the best wedding makeup tips that will help you look flawless no matter what your wedding budget is.

Just say “yes” to the following bridal makeup rules and prepare to shine!

wedding makeup artist

The Wedding Makeup Dos:

Take Care Of Your Skin

An in-depth day and night skincare routine are essential at least 3-6 months before your wedding date to make sure your skin is ready for the big day!

This helps with how the makeup looks and stays on your skin all day.

Make a trial appointment 3-5 weeks before your wedding.

Make sure you have your trial at least three weeks but no more than 5 weeks before your wedding. If you are planning to have a spray tan on your big day, do a test run before your makeup trial, so your artist can see what color your skin will get from the tan,

Be your best self on your trial day. Feel your best on your trial day. Make sure your hair is done, and you’re wearing jewelry so you can see how the overall look comes together on the day.

Wear a light-colored top in a similar tone and shade to your wedding dress. If you have your makeup tested in a store so you can see how the makeup looks against it, and take a photo of yourself in daylight (without flash) to see how it looks before you buy anything.

Accentuate Your Eyes

Brighten up dark areas under your eyes with correctors and concealers.

It’s all about choosing the right shade to match your eye color.

Your eyes should be the focus, not the actual makeup.

A trick to make your eyes pop is to keep color intensity as close to the lash line as possible. Fake lashes also play a big part in creating the pop without requiring heavy eye makeup.

It is always about “lashes and liner.”

Bring References To Your Trial.

Look for pictures of the makeup you really like and bring them to your appointment.
Try to figure out what you like about the makeup in the image and keep in mind that Kim Kardashian’s makeup may not translate to you if you have Dita Von Teese’s skin tone.
Look for faces that have similar coloring and features as you so you can have a similar look created for you.

Wedding Makeup Tips

Consider Colour

Remember that bridal makeup needs to have enough color to balance out the whiteness of the dress. There’s a big difference between everyday wear and a wedding dress, so there should be a difference in your makeup, too.
Start by making sure your skin tone looks even and smooth, then add color to your cheeks and lips to make them glow.

Use Individual False Eyelashes.

They’re a brilliant way to make your eyes stand out and look much more subtle than a full strip. Choose different lengths to create a really natural, fluttery look and nestle them in between your natural lashes rather than pinning them on top.

Don’t skip the basics.

Spend time and care on the most important features of your face, like beautiful, natural-looking skin, gently groomed brows, and feathery lashes.

If you get these fundamental factors right, the rest of your makeup will take care of itself.

Research Makeup Application methods

They can be slightly different from your daily makeup routine.
For example, If eyeliner pencils always smudge because you have oily eyelids. Try working with a dark eye shadow, apply it with a slightly dampened eyeliner brush to make it like a pencil liner but with better staying-power.

Wedding makeup tips

Go Pro

The best wedding makeup should last as long as your day. That’s why professional products should be used – foundation, concealer, lip, and eye products. They offer superior durability to see you through your wedding day and night.

Accentuate The Brow Bone

Complete your makeup look with a subtle highlighter shade on the brow bone to really bring out the eyes.

Choose a light, matte shade and dab it on the outer corner of the brow bone to draw attention to that area of your face. Do not go for a shimmer or shine. It can make you look sweaty or oily in the photos. Trust us on this tip!

Take A few Touch Up Products

Ensure you or a bridesmaid have a powder, lipstick, concealer, and a small brush or sponge in your bag.

These are products you can quickly touch up to ensure you look confident throughout the day.

Wedding Makeup

The Wedding Makeup Don’ts:

Have your makeup tested anywhere there are fluorescent lights

If a professional makeup artist is coming to your home, arrange a time when it’s still light outside.

Let A Makeup Artist Steal Your Identity.

For many people, their wedding is when they can be really excited to have someone else do their makeup.

Still, there can be a temptation to just give in to the experience and take the suggestions from the makeup artist – They do not know you that well, and you may not feel like you.

We would advise real caution here; you don’t want to surprise your chosen one at the altar by showing up looking like someone else.

Whether you hire a makeup artist or do your own, we believe that the best bridal makeup is simply the most exquisite version of what the bride normally looks like – after all, you want to look beautiful, not your makeup.

Don’t Wear SPF

If you’re being photographed with flash, don’t wear SPF sunscreen because the flash can bounce off your skin and make you look washed out. Be sure to test this on your test shot by taking a photo with the flash on.

Wearing Too Much

It’s an absolute myth that your makeup needs to be applied for photos.
Many wedding photos are taken in natural light, and if you choose a heavy base, the makeup will look obvious.

As for the flash, you just need to make sure your T-zone is matte, which you can achieve with fine translucent powder and blotting powder, not layers of makeup.

Anything Too On-Trend

Remember, you will be looking back on your wedding photos for the rest of your life. Don’t look back at them and wonder, “What the hell was I thinking!”

So it’s best to avoid statement looks and opt for something timeless and classic.

That glitter eyeliner and cut crease look that you saw on a Youtube tutorial might look super pretty and modern.

In twenty years, it will probably look tired and dated! Some looks never go out of fashion – think of the classic red lip or a beautiful winged eyeliner – It is timeless.

That doesn’t mean you have to go for a symphony of beige tones if you’re used to bolder makeup – vintage wedding gowns, in particular, can look stunning with a classic Old Hollywood lipstick color.

Don’t Be Afraid To Go A Little Lighter.

Neutral, brown, and pale lip colors can look washed out in photos, so choose a lipstick that’s a shade or two lighter than what you normally wear.

If you usually wear a neutral shade, it should be worn as a base, with a pink or rose color on top. If you usually wear dark lipstick, use it as a base, and apply a lighter pink over it to spice up the color.

Pink tones such as roses and plums are all great, classic colors for brides.

Apply Makeup To The Face Only

Instead, sweep it down your neck and over your shoulders if necessary. This will ensure your face isn’t a different color or even texture than your body.

Everything should look even for the most natural look possible.

A great way to blend uneven skin tones together is to use a light fake tan. Do this the day before the wedding, not at night, and beware of darkening your skin tone too much, as this will make your complexion look less natural.

Natural wedding makeup

Long Wearing Makeup

Forget to decide what kind of care you would prefer for the day

Do you want to check that you look good throughout the day, or do you just want to forget about your makeup as soon as it’s applied?

Waterproof mascara is an obvious requirement, but it’s also worth considering many cream eyeshadows are long-lasting, and you can be sure they’ll stay where you put them.

Making Your Eyes Too Dark

Define your eyes by applying color in the eye crease, but avoid using a shade that’s too dark or doing too much contouring in the eye socket line. It can distract from the eyes themselves.

Too Glossy Or Too Matte

It’s best to avoid lipsticks on either end of the texture scale; too glossy, and they’ll only last five minutes, while too matte can leave your lips dry and cakey when it’s time to kiss your groom.
A moisturizing, satin lipstick is best for a wedding – this type of formula makes your lips look their best and goes on most evenly and naturally; several thin coats dabbed on in between for an extra long-lasting finish.

Get The Timing Right

Remember to allow at least 45 minutes to an hour for makeup application on your wedding day.

Now relax – You have everything planned. Remember if you are not confident with hair and makeup, there are many mobile makeup artists and hairstylists that can come to you on your special day

The Article Wedding Make up Tips First Appeared ON

: https://limitsofstrategy.com